Thursday, June 16, 2016

THROWBACK THURSDAY - Choker Necklaces

Remember those "tattoo" choker necklaces and bracelets from the early 2000s? I had a black choker necklace that I wore for a good part of 6th grade along with my baggy pants and tank top. It wasn't the most flattering look but 12 year-old me thought my look was pretty fierce.

After the choker trend faded, I realized that I hated short necklace chains. To this day, I still prefer pendant-length ones. I can occasionally find one that falls in the middle. I feel like necklaces that are super short or chokers make my neck look really short.

I noticed recently that 15 years later, the choker trend is back in full force for a whole new generation to fawn over. The biggest difference is that there are way more styles.
I had this exact choker in middle school! © Forever21.com
Did you sport a choker in your younger days? Are you rocking them now? Let me know in the comments below!

Thursday, June 2, 2016

THROWBACK THURSDAY - Which Decade of Makeup Inspires You the Most?

We have so many makeup muses to look back on today. The great thing is that we can pick and choose the components we adore from the past and make it work for us today. Which decade of makeup inspires you the most? This Throwback Thursday is a little bit more involved than the ones before.
The One and Only Audrey Hepburn. What a Beauty!
I love the 1950s makeup look. Very plain skin-toned eyeshadow with black winged liner and mascara. Eyebrows were left quite natural and weren't plucked into oblivion like in the 90s.The most iconic part of it all is the bold red lipstick! I love the neutral eyes with winged liner because you can then pair it with any lipstick. One thing I would change to fit my preference is adding some gold eyeshadow. Think Urban Decay Half Baked for the lids. I think that brightens and opens up the eyes with more dimension. The lipstick can be nude or really vampy and it still wouldn't compete with the eye.
Urban Decay Half Baked Eyeshadow Single © urbandecay.com

I've been really liking the Urban Decay x Gwen Stefani eyeshadow palette to achieve this look using the champagne shimmer and light matte shades. I love to use the shades Blonde (satin) as a highlight and Skimp (satin) or Stark (matte) for the lids. This is essentially a very simple two-shadowed eye look. Very minimal to no blending required!


Speaking of which, Ulta will be having the Gwen eyeshadow palette for sale for $39 starting June 5 according to their most recent catalog. That price is a little nicer than when I used my 20% off last year as it is regularly $58. It's a great chance to snag it if you've been a little put off by the price.

For my winged liner, I've been really digging Essence Waterproof Liquid Eyeliner. I recently raved about it in my May Favorites. The formula is a very opaque black and doesn't flake if you go over a spot more than once. My favorite part of it has to be the applicator. It has a stiff foam-tipped (I think it's foam) applicator and makes it really easy to control. I apply that right over Skimp or Stark.

Top everything off with a black mascara and your eyes are set! I like to use CoverGirl Lash Blast 24hr. This stuff does not budge.

Now for the really fun part: bold red lips! You can really pair any lip color with these neutral eyes, but red is just so quintessentially 50s. My favorites are Maybelline Color Sensational 645 Red Revival, Milani Color Statement 67 Matte Confident, and Urban Decay x Gwen Stefani Mega Matte 714.

Frankly, this look is rather low-maintenance for me, but it could just be the lazy girl talking! I love how this look is so simple yet so polished. Let me know if you'd like to see a tutorial on this :)

Which makeup decade is your favorite? What things do you do differently to modify them? Let me know in the comments below!

Tuesday, May 31, 2016

May Favorites

May just flew by in a flash! I can't believe we're at the end of the month already. I almost forgot to do my May favorites! But here I am with this post before the clock strikes midnight!

I have three products that I'm really digging at the moment:

Maybelline Fit Me Concealer Light 10, Essence Waterproof Liquid Eyeliner, Essence Lash & Brow Gel Mascara
Maybelline Fit Me Concealer in Light 10

I've been searching for a good medium-to-full coverage concealer. I wanted to replace my current favorite that I purchased from a store called Muji in Japan. I won't be able to replenish until my next trip and it's unfortunately TBD!

I picked up Maybelline Fit Me Concealer in Light 10 from the Harmon's section at my local Bed Bath & Beyond. Light 10 seemed to be the closest match for my neutral-warm-yellow skin tone. So far, so good. I would consider this to be medium coverage. I bought it mainly to cover up my under eye circles and the occasional breakout. I haven't tried adding a second application of concealer for my under eye area for fear of it looking too chalky. I like to apply my concealer after foundation in case I actually don't need as much coverage. I like to use Lancôme Dual Finish Versatile Powder Makeup in Matte Bisque II to lightly set the concealer and it seems to last all day. Lancôme must have added more shades in their range since I've purchased my compact a few years back because I can't find an exact match for the name on the shade list.

Essence Waterproof Liquid Eyeliner

Essence really has some amazing gems and affordable ones at that! Essence products are available at Ulta and now Target.

I think their Waterproof Liquid Eyeliner is fantastic! This has a stiff pointed felt tip applicator that's easy to control and doesn't seem like it would fray after a month of use. It's definitely on the thicker side but I don't mind since I have to do thick lines anyway. Winged liner is my jam and I can easily achieve that look quickly by drawing the point then filling in between the lines by laying the applicator parallel to my upper eyelid. It dries pretty fast too so transferring on the rest of my upper lid or lower lid isn't an issue. I have oilier lids and this stuff doesn't budge. No raccoon eyes here! Best of all, the black color is super opaque and dries matte. I didn't have to go over any patchy spots.

Removal at the end of the day takes a little bit of effort but not too much more than a non-waterproof eyeliner. There's a non-waterproof option available. I'm curious about their eyeliner pens but I chose this one since it came with a lot more product.

Essence Lash & Brow Mascara Gel

I've been looking for a brow gel and I think Essence Lash & Brow Mascara Gel fits the bill. My brows have been getting a little unruly lately in between shapings so this helps keep things looking neater. Again, super affordable!

The wand is a traditional bristle brush. The formula has a nice consistency and is a little on the thinner side. It doesn't make my eyebrows feel stiff at all.

I tried one from Rimmel last month and it flaked like crazy even after only an hour of applying. I returned it to Target (super quick returns for makeup, by the way!) I have dark eyebrows so any flakes of any kind are way more obvious one me than someone with lighter ones.

What are your May favorites? Let me know in the comments below!

Monday, May 23, 2016

MANI MONDAY - China Glaze Agro

Today I have a lovely warm mossy green nail polish to share. It's Agro by China Glaze. It was launched a few years ago in a cross-promotion with the first Hunger Games movie. This shade reminds me so much of autumn and the glowy orange shades that get released left and right. I wish there were more shades like this during fall time. It would be nice to have some variety other than the typical oranges and reds. Although, I do love those shades, too!

China Glaze Agro
Agro has a lot of depth and dimension. I guess it has a little bit of a frosted finish but not too exessive so that there are super obvious brushstrokes. There are very subtle gold shimmers in it, too. It reminds me a little bit of dried seaweed. Great, now I want sushi :-p

Unfortunately, this along with the rest of the Hunger Games nail polish collection has been discontinued.

Did you pick up any of the Hunger Games nail polishes while they were still out? What beauty collaboration are you most excited about now? Let me know in the comments below!

Saturday, May 21, 2016

LIPSTICKS - Urban Decay Revolution & Matte Revolution Lipsticks Currently $11!

Many of us have probably noticed the sudden drop in price for the Urban Decay Revolution lipsticks in the past few weeks at the usual UD retailers. They went from $22 to $11 and there was a lot of buzz in the online beauty community as to why and for how long. I first found out about the sale price through Nouveau Cheap and eventually the reason for the price drop in this post. The referenced article can be found here at Refinery 29.

I adore UD's iconic purple packaging!
I didn't want to wait too long to get this post up since the new UD Vice lipsticks are debuting in June. I hope this information is handy for those who want to grab some before the original packaging is long gone (as well as the discounted price!). The current shades as well as previous limited edition ones will be available with the relaunch.

Urban Decay Revolution Lipsticks Left to Right: Naked, Rapture, Rush, Venom, Matte After Dark, Matte Blackmail
The color-matched labels were a nice touch.

Urban Decay Revolution Lipsticks Left to Right: Naked, Rapture, Rush, Venom, Matte After Dark, Matte Blackmail
The label for Naked looks more beigey in person compared to the actual lipstick bullet.

UD Logo Embossed on Top of Caps
UD Revolution Lipstick Packaging
I think this is some of the most gorgeous lipstick packaging I've ever seen. It's quite understated yet edgy at the same time. The gunmetal casing is for the regular finish and the black casing is for the matte finish. Inside there's purple casing around the bullet itself. There's a nice heftiness to these lipsticks. I quite like how the caps fit snugly over the tubes. No worries about the caps coming off in my purse! I'm usually not one to buy lipstick for the packaging but this is really a bonus! The formula is the deciding factor for me.

As of the time of this post, there are still some UD Revolution lipsticks available at the following retailers (shade availability will vary):

Urban Decay Revolution Lipsticks at Macy's (free shipping w/ beauty purchase)
Urban Decay Revolution Lipsticks at Sephora
Urban Decay Matte Revolution Lipsticks at Sephora
Urban Decay Sheer Revolution Lipsticks at Sephora

Brick and mortar stores may still have a handful available if they haven't all been sold out already.

I know these lipsticks are loved by many since they are supposed to be very pigmented and moisturizing, so it was very difficult to resist picking some up to try out. A couple years ago, I received a teeny tiny tube of the shade Anarchy in my Ipsy bag. It's such a bright Barbie pink shade and I wasn't brave enough to wear it out. I was still fixated on the spicy shades that looked "safe" with my coloring. It slipped my mind and I forgot to swatch that one.

Here are some arm swatches:

Urban Decay Revolution Lipsticks Left to Right: Naked, Rapture, Rush, Venom, Matte After Dark, Matte Blackmail

Over the course of the past few weeks, I wound up acquiring six shades. Four with the regular creme finish and two with the matte finish. As much as I wanted to experiment with a bunch of super bold colors, I played it relatively safe with this set. I wanted to make sure that I would actually use these shades and not have them sit and collect dust. You can probably guess that Blackmail will get the least use from me, but I wanted just one shade that was really outside of my comfort zone.

If you're curious as to how I ended up with six new lipsticks, then read on!

I started out with only getting Rush from Macys.com since it was still unknown at the time if these were temporarily discounted or permanently discontinued. I didn't want to go too crazy right away with getting so many. I was lurking on urbandecay.com and put another lipstick in my shopping cart and clicked out of the window. A couple days later, UD emailed me and said that if I purchased the lipstick, I would receive a deluxe sample of All Nighter Makeup Setting Spray and 4-shade Sheer Revolution sample. I've been wanting to try their setting spray for years now so I caved and added one of the few remaining shades of lipstick left, which was Blackmail. There's also free shipping if you sign up for their UD Beauty Junkies Rewards program.

Urban Decay Revolution Lipsticks Left to Right: Naked, Rapture, Rush, Venom, Matte After Dark, Matte Blackmail

I have a huge weakness for berry shades and have been contemplating getting Matte After Dark. I figured I'd probably wear it a lot because it would seem flattering. I went ahead and ordered a tube from Nordstrom.com with my three free samples and free shipping. I said to myself that this was it.

Of course, it was then announced that UD is discontinuing their current line of Revolution lipsticks for their relaunch this summer. There will be new packaging similar to the Gwen Stefani and Alice in Wonderland lipsticks with a pointed bullet. I don't mind the round bullet and really like the purple and gunmetal packaging of the current ones. They do feel very luxurious in the hand. Aside from Clinique and Lancome (they're all from GWPs), these were going to be the fanciest lipsticks I owned. I couldn't imagine the formula and shades being radically different anyway and figured the next relaunch wasn't going to be for another good while, so I planned to get three more shades.

I saw that Ulta.com still had quite a few shades left so I waited until the following Wednesday morning for them to announce their Beauty Break on top of their lowered free shipping order minimum of $35. If you spend the minimum, you get a bunch of bonus goodies. Often times, the minimum is $50, but through a glitch in the system, I was able to get the 8-piece bath Beauty Break and three additional deluxe samples on top of the ones they already send you. I have yet to try these, but they were a nice bonus treat.

I've swatched the six lipsticks on my lips so you can get a better idea of how they look "on".

Urban Decay Revolution Lipstick Naked
Naked is the palest shade I picked up. It's a light pink shade with a little bit of brown.  I'm always on the prowl for light pink shades that don't make me look washed out for when I do a really dramatic eye. I think this fits the bill.

Rapture is a mauvey berry shade. It's very flattering on my complexion. I can see myself reaching for this one a lot.

Rapture surprised me a little bit. I didn't expect it to be as berry-toned as it turned out on my lips. I am pleasantly surprised since I love berries! In person, I see a touch of brown in the bullet but it doesn't show up on the lips.
Urban Decay Revolution Lipstick Rapture

Rush is a warm medium pinky brown. It's a little bit darker and warmer than Naked. I love this as an everyday color. It's a lovely shade for attending class or going to work.
Urban Decay Revolution Lipstick Rush

Venom is a deep raspberry shade with very fine rosy shimmer. The shimmer is not gritty at all and doesn't make the shade frosty. I don't think this leans too cool or too neutral so I think it can go great with lots of different skin tones. It's so fall, I love it!
Urban Decay Revolution Lipstick Venom

Matte After Dark is another raspberry shade but it's a little redder than Venom. It looks magenta by comparison. There's a bit of plummy shimmer in it that makes this a very unique lipstick. Combined with the matte finish, the shimmer gives this shade a very plush and dimensional look. The shimmer is not gritty and blends well with the formula.
Urban Decay Revolution Lipstick Matte After Dark

Now onto the most daring lipstick I've ever purchased: Blackmail! It's a deep dark wine shade that leans cool. UD wasn't kidding, these lipsticks are loaded with pigment. I was trying really hard to get an even application with Blackmail and every time I went over a spot again, it would get significantly darker and patchy. So, I ended up with the final look below. I would highly recommend applying this one with a lipstick brush so you can build up the opacity. There is very little room for error while applying straight from the tube. I tried it again the next day and it sheered out to a very nice and wearable black cherry shade. I guess I would go through less product if I use it this way, but I can already imagine reapplying being a hassle while I'm out and about. The edges were extra tricky so the center of my lips don't look as dark by comparison. At full opacity, I think this shade leans more cool than when it's sheered out. I think that may have more to do with my pigmented lips than anything else, though.

If you're looking for a nearly black but not full on black lipstick, this is the one for you!
Urban Decay Revolution Lipstick Blackmail

The formula in these lipsticks were really wonderful. Even the mattes were quite moisturizing for what they are. They all applied very smoothly without skipping and were very pigmented.

The regular creme formula was very buttery but expect to reapply every few hours depending on how often you eat/drink. I don't get annoyed over this very much if the brand isn't touting the product as long-wearing.

The mattes went on very smoothly and were extremely velvety. This is where I can really see the justification of the $22 price tag. The formula was just so lush and luxe, I haven't tried anything else like that before. These are not as dry as the Milani Color Statement Matte lipsticks. Because these mattes aren't as dry as your usual matte lipstick, they're bound to fade within a few hours depending on how much you're eating/drinking. I'd like to think of the staying power to be between a regular creme lipstick and a long-wearing staining lipstick. It's actually good that it's not long-wearing because it won't get all weird and clumpy when you reapply.

I'm happy with the shades I picked up. I made sure that I chose wearable shades so the $11 per lipstick cost would be more worth it. I very rarely buy lipsticks from department stores so this was an exception since UD's doing a complete overhaul of their collection.

Although the regular formula is very nice, I'd recommend picking up at least one shade from the matte collection while the sale is still happening. I found this formula to be super comfortable on the lips and extremely pigmented.

If there are certain shades you've been eyeing but aren't currently available, keep checking back. I've seen online retailers randomly restock. However, I'm not sure how long they'll be restocking for since the UD Vice lipsticks will be released in the next few weeks.

Are you planning on picking up some Urban Decay Revolution lipsticks while they're on sale? Do you already own some shades? If so, how do you like them? Let me know in the comments below!

Monday, May 16, 2016

MANI MONDAY - Zoya Lotus

I chose Zoya Lotus for this Mani Monday since I'm attending a networking event tomorrow. It's muted enough to not be distracting but it's still more interesting than a typical nude shade. I love dusty shades like these for the office.

Description from Zoya.com:
Lotus is a very soft, dusty blue-toned amethyst purple with colorful shimmer that reflects pink, red and gold. A dreamy smoky shade for purple lovers that looks both soft and luminous.

Lotus was one of my first Zoya nail polishes and I have since acquired many more bottles. The rosy shimmer is so lovely and perfectly compliments the smokey purple base. I hadn't seen any purple shades like this before. Most purples are very dark and blue-based so this was a nice change. The formula is divine and the brush size is just right for my smaller-than-average nails. The bottle is also very beautiful and sleek.

Zoya Lotus

Close-up of Zoya Lotus: Gorgeous shimmer!

Have you tried any Zoya nail polishes? Let me know in the comments below!

Thursday, May 12, 2016

THROWBACK THURSDAY - Bonne Bell Flip Gloss

I almost forgot about this beauty relic of the 90s: Bonne Bell Flip Gloss. Did anyone else carry around one of these wherever they went? I always had some sort of lip balm or lipgloss in my pants pocket. You never know when your lips will get dry.

Bonne Bell Flip Gloss © College Candy
If I can recall, my tube was a translucent greyish blue. I think the bullet was some sort of blueberry but it applied clear. I was probably thinking I was super edgy having a kind of blue lipstick. It was really more of a balm than a gloss since it wasn't as sticky. It was actually one of the few beauty products color-wise I tried when I was in middle school that doesn't make me shudder today when I think about it!

Looking back, this product actually performed well and the gimmicky packaging was useful. Way to go, Bonne Bell! The flip top of the tube would actually stay down when it was closed so it wouldn't accidentally open up and roll around in your purse/pocket lint. I remember opening and closing it just for fun. The action was really smooth on the track. I wouldn't mind having a lipstick like that right now.

Did you own a Bonne Bell Flip Gloss or Flipstick? Let me know in the comments below!

Thursday, May 5, 2016

THROWBACK THURSDAY - What Makeup Technique Did You Formerly Use A Lot But Don't Anymore?

Learning about makeup is a long and winding road. Choosing the right colors, tools, and adopting the techniques that work for you is no easy task for most novices. This brings me to today's Throwback Thursday question: What makeup technique did you formerly use a lot but don't anymore?

Back in high school, I would tightline on my upper and lower waterline every single day. I thought all that black eyeliner looked so bad ass! Sure, the smudging got annoying, but I didn't care about it enough to change my look. I didn't think it was high maintenance at all to reapply my eyeliner at least twice during school.

Between the summer after high school and freshman year of college, I took a break from eyeliner and makeup in general and went barefaced most days. When I started wearing makeup again during college, my style shifted into a very light-handed one. I hit pan very quickly on this one taupe Clinique eyeshadow single and used lots of waterproof mascara. I tried tightlining again and that was when I realized how much I had been limiting my eye space. That was when I consciously decided to stop tightlining all the way around.

Now I love doing winged eyeliner so tightlining is a bit overkill since I've learned that it overwhelms my limited eyelid space. I still love the look on other people, though. Once in a while, I'll smudge a little eyeliner on my lower lash line, but I find using a darker eyeshadow with an angled brush is much easier to achieve that soft smokey look. I also use eyeliner pencils in a totally different way now: as a dark eyeshadow base on my upper eyelid. I wonder if I'll be doing my eye makeup in the same way years from now!

What makeup technique did you formerly use a lot but don't anymore? Let me know in the comments below!

Tuesday, May 3, 2016

LIPSTICKS - Jordana Twist & Shine

This is kind of a blast from the past for me. Jordana was a brand I was into when I was in middle school. I often wore their nude lipstick and topped it off with their clear lip gloss. Up until a couple of years ago, I had completely forgotten about Jordana. Not too surprising since they don't promote as heavily as their other drugstore counterparts like L'Oreal, Maybelline, and Revlon. I don't think Jordana is as widely available as before. You can find permanent fixtures now at Walgreens and Kmart. I happened to stumble upon them the first time in years at a local nail supply store. I saw they had a line of balm stains very similar to Revlon's Balm Stains called Twist & Shine. They were only $2.99 and I ended up taking three shades home with me.

L to R Jordana Twist & Shine Balm Stains: 03 Tropical Frenzy, 06 Cranberry Crush, 07 Rock N Rouge
I was pleasantly surprised to discover how smooth and pigmented the lip balm stains were. Especially at that price! Brands that don't promote heavily like Jordana are able to keep costs down due to much lower overhead. So don't let the low price tag deter you from trying their stuff. There's a lot of gems there! I thought after all this time, Jordana would have started manufacturing from China to keep costs down, but that wasn't the case! Their products are mostly made in the US, which is great! A handful are made in Italy, like their Best Lash Extreme mascara.

Top to Bottom Jordana Twist & Shine Balm Stains: 03 Tropical Frenzy, 06 Cranberry Crush, 07 Rock N Rouge

All shades can be found at JordanaCosmetics.com and in stores at Walgreens and Kmart. I have three shades: Tropical Frenzy, Cranberry Crush, and Rock N Rouge.

I love the twist-up style of these. They're exactly the same as the Revlon Balm Stains and Clinique Chubby Sticks.

L to R Jordana Twist & Shine Balm Stains: 03 Tropical Frenzy, 06 Cranberry Crush, 07 Rock N Rouge

L to R Jordana Twist & Shine Balm Stains: 03 Tropical Frenzy, 06 Cranberry Crush, 07 Rock N Rouge


Jordana Twist & Shine Balm Stain 03 Tropical Frenzy

Tropical Frenzy is a fun pink shade for summer. I don't think it leans too warm or too cool.
Jordana Twist & Shine Balm Stain 03 Tropical Frenzy

Jordana Twist & Shine Balm Stain 06 Cranberry Crush

Cranberry Crush is "so me". I love these kinds of berry shades. I think it's more of a raspberry shade than a cranberry one, though.
Jordana Twist & Shine Balm Stain 06 Cranberry Crush


Jordana Twist & Shine Balm Stain 07 Rock N Rouge

Rock N Rouge is a warm-leaning red. I think this is the boldest and most pigmented of all the shades. Not ones of my faves since I'm sensing something kind of off about this shade on me and brings out quite a bit of redness in my face. I'll have to try this again when I'm paler in the Wintertime.
Jordana Twist & Shine Balm Stain 07 Rock N Rouge

How do these compare to Revlon and Clinique?

Jordana's leaves a light stain on the lips, but Revlon definitely has the stronger stain and is the least emollient of the three. Clinique is in the middle in terms of intensity of staining and doesn't have as much slip as Jordana.

I'm so happy to find that Jordana is still very much alive and well. They're definitely an underrated brand in the drugstore beauty world. I'm glad that during times like these, we easily can share these gems with others.

I have a few more Jordana finds that I want to share in upcoming posts.

Formula:
The formula feels quite hydrating and has a good amount of slip. They leave as much of a stain as a regular lipstick does. Not quite to the same level as the Revlon Just Bitten Kissable Balm Stains. This may be a plus for those with drier lips if you found the Revlon ones to be uncomfortable.

There's a bit of a sweet scent to these that doesn't bother me, but I don't love it either. I'm pretty neutral on this one and I don't consider myself a gourmand when it comes to scented beauty products. I actually prefer the minty scent of the Revlon ones.

Packaging:
The packaging is very cute as most crayon-inspired products are. The caps seem to stay on very well so no need to worry about your lippie rolling around in purse lint! The color of the tubes are not exact matches of the color inside but they're good enough to distinguish one from the other if you have multiples.

Favorites:
I really love Cranberry Crush. If you don't already know, I love berry tones! Rock N Rouge may be a little too warm for me.

Is It Worth Your While?:
If you want lip colors in a crayon-style packaging, then these are a great option for you if the Revlon ones aren't catching your eye. I feel like the Jordana ones are a bit more hydrating than the Revlon ones. I personally would've preferred if it stained more, but this may be a good sign if you have really dry lips. They only cost $2.99 so it'll be easy on your wallet if you want to get a few shades to try.

Have you tried Jordana Twist & Shine before? How about the crayon-style lippies by Revlon and Clinique? Let me know in the comments below!

Monday, May 2, 2016

MANI MONDAY - Essie No More Film

Hi! Hi! Happy Mani Monday to you!

Today I have one of those classic dark blueish purpley aka "blurple" nail polishes to share with you: Essie No More Film. I think a lot of people have a shade like this in their collection as this is a type of shade that gets re-released in different collections every now and then. I bought it thinking it would be a more obvious eggplant purple. It's actually a very inky shade and not as vibrant as online photos.

Essie No More Film
I plucked this out from my stash because I had neglected it for a while so I decided to showcase this one today. If you're looking for a muted, dark blue-leaning purple creme nail polish, this would be a great option. The formula isn't too runny or too thick. It's a very lovely formula to work with and you can get full coverage with two coats.

Have you tried Essie No More Film before? Do you have something just like it? Let me know in the comments below!

Thursday, April 28, 2016

THROWBACK THURSDAY - Scrunchies

Growing up in the 90s, it was a given that you'd tie your hair up in a scrunchie if it was long enough. The poofier, the better. I remember there were all sorts of bright colors and frilly lace on them. Watching Unbreakable Kimmy Schmidt on Netflix sparked my inspiration for this week's Throwback Thursday.

I loved scrunchies and hair ties with cute little baubles on them. I remember my hair was (and still is) too thick and slippery for one scrunchie to hold up in a decent ponytail by itself. I always had to double up on them and they would lose their elasticity not too long after. I would have tie them three times around my ponytail and the fabric would be pulled so tight, the scrunchie effect was gone. At the time, hair ties with rubberized grips hadn't made their way to the mainstream yet. The side ponytail was huge, but I never tried it because I thought it was too "out there" for my taste. I secretly admired the girls who could pull off that look.

If you're feeling nostalgic, apparently Forever 21 is selling them! Although these aren't as poofy and frilly as the ones I recall.
Scrunchie set from Forever21.com © Forever 21
When I went to Tokyo, I noticed there were quite a few girls still sporting scrunchies but they were more grown up incarnations of the 90s ones. Silky fabric in delicate colors like taupe and peach with a little lace detailing on the edges. Paired with the right outfit, it can still look cute. I guess the scrunchie still lives on!

Do you still wear scrunchies? Were you super excited like me when there were hair ties available with rubberized grips? Let me know in the comments below!

Wednesday, April 27, 2016

TUTORIAL - Prom 2016 Makeup with Urban Decay Naked Palette (and Other Fabulous Things!)

I cannot believe that another prom season is upon us! When I was in high school, I didn't care a lot about dances, let alone proms. I ended up going to my senior prom with some friends. A couple of us went stag but it was no biggie. We were alone together! It was a fun hang with my friends, but I wouldn't consider it life changing.

I did love my dress, though. It was an A-line strappy knee-length dress with gold underneath and a black lace overlay. It had a very vintage vibe.

I did my own makeup for prom. I remember using L'Oreal Bare Naturale Mineral Foundation, gold CoverGirl eyeshadow, tightlined black eyeliner, some kind of blush, and lots of waterproof Revlon mascara. I can't even remember wearing anything on my lips. I was very much ignoring that part of my face when I was in high school. I wouldn't be surprised if I went with a plain lip balm. Now I love lipstick and I get really excited about it. I also used to tightline my eyes everyday and I don't anymore. You grow up and your tastes change. Back then, I already loved playing up my eyelashes and I still do. So some things do stay the same.

My original prom dress resembled the one I'm wearing here.

It occurred to me that there may be some people out there wanting to do their own makeup but don't know what to use. If you have the budget for it, I would highly recommend purchasing one of the Urban Decay Naked palettes. If you pick the right one for you, it can become such a versatile tool to have in your beauty arsenal. You can continue to use a given palette long after prom is over: for graduation, attending lectures, interviews, work, etc. That's the thing I really love about these neutral palettes. You can use them to create really simple and pretty daytime looks, but you can also create gorgeous dramatic ones--all in the same palette! Admittedly, I went a little crazy and bought all three (Side note: I was planning on doing my own makeup for my wedding and I had a really hard time deciding which palette to go with and eventually ended up with all of them!). If you can find the one that suits you the most, that should suffice. Feel free to ask the sales associates at Sephora, Ulta, Macy's, or Nordstrom to help you out if you're feeling overwhelmed with your choices.

If you like my makeup look want to take the DIY approach for your prom/formal event, then read on for my tutorial!

If you're like me and have demilids/monolids and hooded eyes, it's very difficult to find looks that translate well from what we see in magazines and online. To top it all off, my eyes are also uneven! Oh, and don't forget about my stick-straight lashes! A very important tip is to always look straight ahead into the mirror to check your progress every now and then. I cannot tell you how many times I've put so much effort into doing beautiful shading on my eyelids only to have it all disappear when I opened my eyes. It's so frustrating because I love eyeshadows!

I can only tell you what works for me as someone who has demilids and hooded eyes, so you may need to make some adaptations to suit your eye shape.

Whenever you're using a dark or very glittery eyeshadow, hold a bit of tissue right under your eye and rest it on your cheek. This will catch any fallout that occurs and it won't mess up your foundation. Speaking of foundation, use one WITHOUT SPF. The SPF will cause flashback in your photos. There are lots of affordable non-SPF options at drugstores.

My products list:
Revlon ColorStay Whipped Foundation 200 Sand Beige (Long-wearing & looks great in photos. I used this when I did my own makeup for my engagement photos and Chinese wedding banquet.)
Stila Stay All Day Concealer 05 Hue
Urban Decay Primer Potion
Urban Decay Naked Palette
CoverGirl LashBlast 24hr Mascara Black (I think this may soon be discontinued)
Milani Anti-feathering Lipliner Pencil
Jordana Modern Matte Lipstick Matte It Girl (Available in-store at Walgreens and Kmart)
Essence Silky Touch Blush Babydoll
Smashbox Baked Fusion Softlights
e.l.f. Makeup Brushes


Once you have curled your eyelashes and applied eyeshadow primer, apply the shade Naked all over your lid stopping just at the socket. You can see here I'm not fully monolid nor am I double-lid.


Use a black eyeliner pencil to line your upper lid as close to your lash line as possible. Stop right when you're able to see the top edge of the black eyeliner with your eyes open. Extend the line just past the length of your upper lash line for a slight wing. My wings point a little downward due to my hooded eyes. Otherwise, the hoods cause a break in the continuity of the wing.

You don't need to be 100% perfect with this step. This eyeliner is acting as part of a base and it will create more depth in the look.


Take a dense C-brush or small flat eyeshadow brush and pat the shade Creep right over the black eyeliner. Gently blend the eyeliner and Creep together to bring the dark shade up a little higher on your eyelid. Just enough so that the dark eyeshadow can show up while your eyes are open.

I love this trick especially for hooded eyelids that tend to get oily. It's like a symbiotic relationship: the eyeliner acts as a base for the eyeshadow, and the eyeshadow sets the eyeliner and minimizes creasing. Win-win!


Take a small blending brush and apply Buck right at the outer edge of Creep and carefully blend. This will smooth out the harsh black edge. For the inner portion of the eye, apply a bit of Half Baked for more dimension.


Take a little bit of Darkhorse and apply it right over where Buck and Creep meet. Again, this is for added dimension.

Finally, use Virgin as a brown bone highlight and make sure it's blended well with Buck.

Take a step back and see how all the colors are working together. Is everything blended smoothly? If you have small eyelids like I do, use caution when blending because doing it too widely can cause everything to look muddy. I found myself using smaller brushes to accomplish this.


Use a small slanted brush and use Creep to line the outer 2/3 of your lower lash line. If Creep looks too dark and harsh, you can substitute it for Hustle instead.

Unlike my former high school self, I didn't tightline here. It actually gives the illusion of smaller eyes and that's the opposite of what I'm trying to accomplish!


Use Virgin again with a small brush or applicator and highlight the inner corner of your eye. I like to bring the shade about 1/3 of the way on my lower lid to meet the darker shade.

Apply generous coats of waterproof mascara. Nothing else can help build volume and hold a curl for straight lashes more than waterproof mascara. The best kind allows you to build up your volume while holding the curl and not allowing your lashes to droop. Also, you're going to want your mascara to be waterproof if you're going to be dancing and having fun with your friends. This would not be a good time for raccoon eyes, speaking from someone who is very experienced with smudgy mascara!

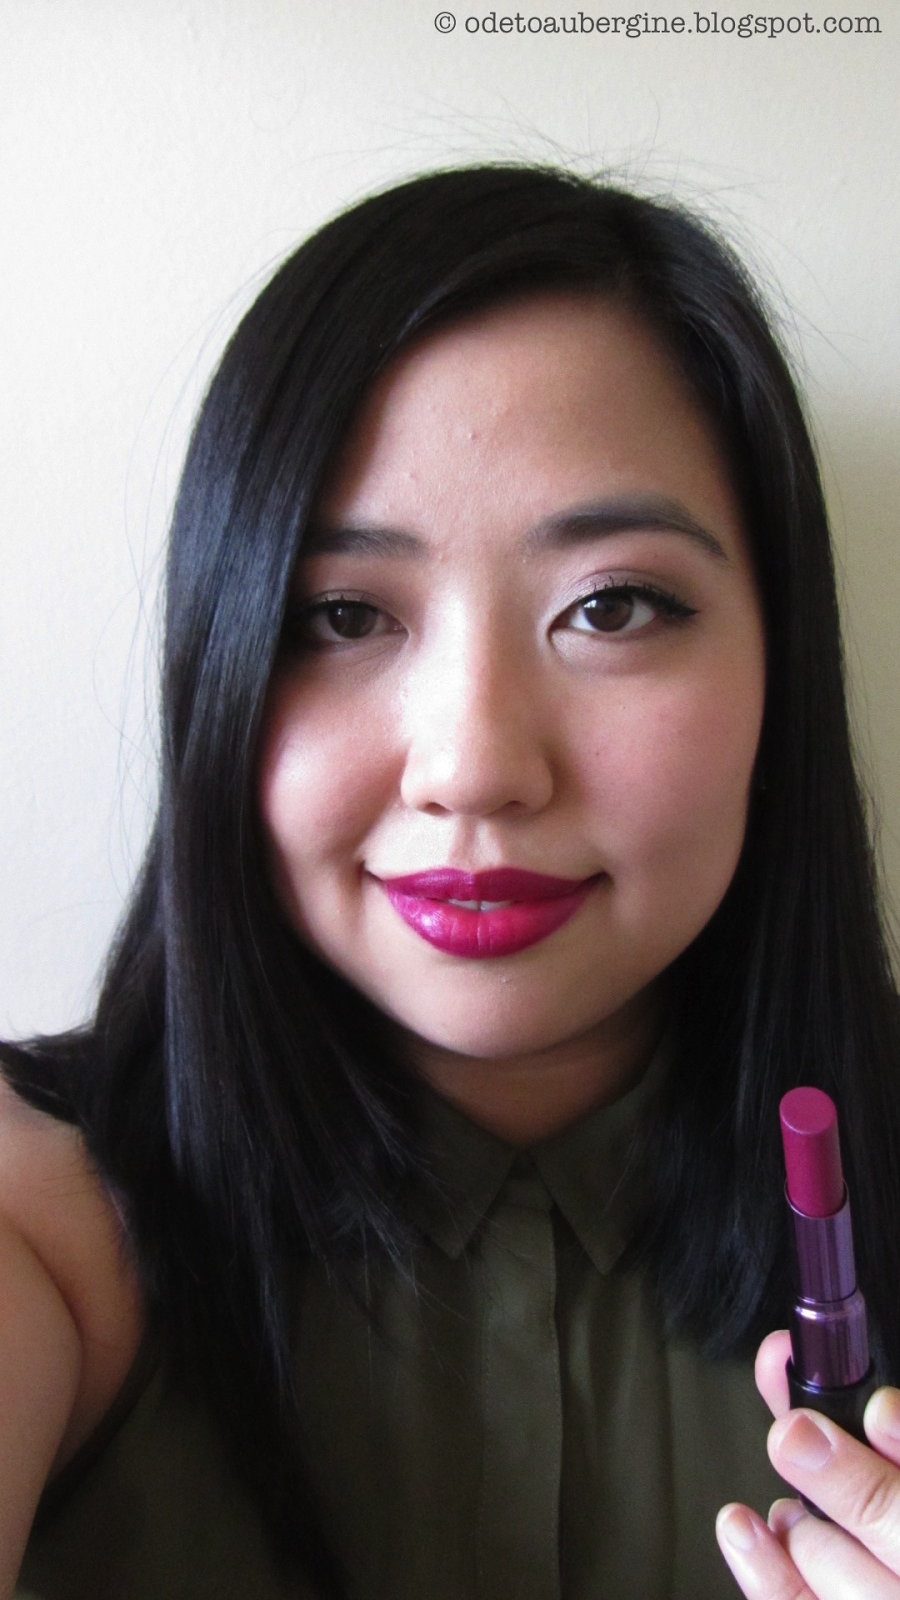
Since this is a neutral eyelook, you can keep your lipcolor very tame or bold. Either way, find a lip color formula that's low-maintenance. If you're planning on taking photos, that's one less thing to worry about!

For this look, I used Jordana Modern Matte lipstick in Matte It Girl. Since matte lipsticks are not as emollient as their creme counterparts, they have a bit more staying power. If I was on auto-pilot, I would've slapped on a classic red lipstick because of my curled hair. I wanted this look to be "modern vintage" and it's Springtime, so why not?

After applying Stila Stay All Day Concealer in Hue for my undereye circles and set with some translucent powder, it's time for the final touches! I used my new favorite Essence Silky Touch Blush in Babydoll on the apples of my cheeks. Then I lightly swept Smashbox Baked Fusion Softlights across the tops of my cheeks, nose, forehead, and chin. Start off with a little bit and you can always build it up since you don't want to look too shiny.

Apply a few spritzes of makeup setting spray and you're good to go! This will keep your makeup from inevitably melting and smearing across your face if you're going to be working up a sweat on the dance floor! I like to use Make Up Forever Mist & Fix.

Here's the final look (again)!

 
I hope this tutorial was helpful for someone out there. It was a bit of a process to take all the steps down but it was fun! The hardest part was probably dealing with lighting and getting decent shots of my own eye. Constructive criticism is welcome!

Do you have prom or any formal events coming up? Are you going to be doing your own makeup? Let me know in the comments below!

Monday, April 25, 2016

MANI MONDAY - Glitter Gradient Nails

Happy Mani Monday! Today I used one of my favorite shades for this gradient manicure: China Glaze For Audrey.

I applied my OPI Glitter Off Peel-able Base Coat, then I used two coats of For Audrey. I followed up with a coat of Seche Vite Dry Fast Top Coat so I can quickly apply the subsequent coats of color. Then I topped off the tips with China Glaze Champagne Kisses and Sephora X Mind Blowing. I applied one final coat of Seche Vite to smooth out the glitter.

China Glaze For Audrey is the perfect robin's egg blue and the color is just timeless, just like Audrey Hepburn herself! This color is supposed to be a match for a Tiffany's gift box! The formula is perfect and covers very well in two coats.

CG Champagne Kisses is a soft champagne gold microglitter polish. The glitter is very dense so you can get smooth and even coverage.
 
Sephora X Mind Blowing is a neon yellow shade with micro, medium, and large hex glitter. I found this one at TJ Maxx recently for $0.70! It has a nice distribution of glitter so you don't have to fish for each piece.


I thought I'd do something a little more glitzy since prom season is here. I usually think of these types of nail looks for the holiday season but the color scheme here just scream Spring!

Have you tried any of these shades before? Do you like the look of gradient nails? Let me know in the comments below!

Friday, April 22, 2016

LIPSTICKS - What a Steal! CoverGirl Lip Perfection Lipsticks for $2.50!

Happy Friday, dear readers!!!

Have you ever tried CoverGirl's Lip Perfection lipsticks? I know that CoverGirl revamped this line and now they're called Colorlicious instead. They both have the same type of square tube packaging but many of the shades got discontinued and only a few from the Lip Perfection line advanced to the Colorlicious line. All of the shades in the Lip Perfection line had pewter caps. Now the Colorlicious line has colored caps corresponding to the lipstick shade family. You can view the new ones at Ulta.com.

L to R: CoverGirl Lip Perfection Lipsticks in 205 Smolder, 260 Heavenly, 305 Hot, 308 Ravish, 310 Smitten, 324 Tantalize, 355 Tempt, 360 Euphoria

Why am I posting about a bunch of discontinued lipsticks? Because I think they're amazing quality, really pigmented, and affordable! If you happen to live near a Big Lots, (at least in my area in SoCal) they often have the CG Lip Perfection lipsticks on sale for $2.50 and sealed! Even better if you can score them on a weekend when they're offering 20% off everything. Definitely check out your local store! I built my own CG Lip Perfection stash solely from buying them from Big Lots. I'm pretty confident these will still be around since I was able to purchase them during different times of the year. Now, I can't guarantee they'll be available by the time you read this, but it's worth a shot, right?

L to R: CoverGirl Lip Perfection Lipsticks in 205 Smolder, 260 Heavenly, 305 Hot, 308 Ravish

L to R: CoverGirl Lip Perfection Lipsticks in 310 Smitten, 324 Tantalize, 355 Tempt, 360 Euphoria
I really love the bottoms of these lipsticks. The color is pretty close to the shade of the bullet. You also don't have to worry about a sticker wearing off. It just looks cool! I like to have these all lined up nice and neat. It's easy to do since the bases are square.

For those of you who have never heard of Big Lots, it's is primarily a discount store. All of their merchandise is new and sealed. You can often times find other drugstore makeup brands here, but my favorite products that I've picked up from there has to be these CG lipsticks.

L to R: CoverGirl Lip Perfection Lipsticks in 205 Smolder, 260 Heavenly, 305 Hot, 308 Ravish, 310 Smitten, 324 Tantalize, 355 Tempt, 360 Euphoria

I know a lot of people, including myself, love budget-friendly options. This is a low-risk way for you to try out a color that's more "out there" without committing to a big sticker price. Personally, I bought bolder colors, but there were definitely "safer" color options in the selection that I saw. Buying these lipsticks from Big Lots is also a cost-effecient way to build up your lipstick collection. Frankly, if I'm not attached to a particular high-end collection for any reason, I'm fine with settling with a drugstore option that's more affordable.

I would like to share my collection with you dear readers. Let me show you how amazing the color-payoff is. I've swatched them on my arm and my lips.

L to R: CoverGirl Lip Perfection Lipsticks in 205 Smolder, 260 Heavenly, 305 Hot, 308 Ravish, 310 Smitten, 324 Tantalize, 355 Tempt, 360 Euphoria


CoverGirl Lip Perfection Lipstick 205 Smolder

Smolder is a warm and spicy nude shade veering on terra cotta but not as orange. This was the very first Lip Perfection lipstick that I acquired. I really like it as it goes with many different makeup looks.
CoverGirl Lip Perfection Lipstick 205 Smolder
It's a great year-round shade. If I didn't have so many other lipsticks, I'd be happy just carrying this one in my purse!

CoverGirl Lip Perfection Lipstick 260 Heavenly

Heavenly has got to be in my top favorite lipsticks ever. It's a warm pink with a hint of brown in it, so it works really well with my skin tone. This was the first lighter pink lipstick that didn't make me look ill.
CoverGirl Lip Perfection Lipstick 260 Heavenly
Everytime I put this on, the color just perks up my face and it's a nice change from the spicy shades that are my other go-tos. I realized that I was going through this tube pretty fast so I managed to nab another one at my last Big Lots trip.

CoverGirl Lip Perfection Lipstick 305 Hot

Hot is very true to its name! It looks like it glows on me and it's a definite blue-based red. I hear this is the shade that Taylor Swift has in her stash. Who knows if she really wore it more than once because I bet she has tons of red lipsticks! Anyway, it was just an anecdote I read online before! I looked up some pictures of her supposedly wearing this and on her, it looks more muted. The power of different skin tones, I'm telling you!
CoverGirl Lip Perfection Lipstick 305 Hot
On me, it's a very bright cherry red--almost like neon orange mixed with a lot of red. It's so intense! I would likely save this for special occasions. I've notice that these kinds of shades make me look a lot more tan. I have a few nail polishes that do that, too. That's my oliveness showing through!

CoverGirl Lip Perfection Lipstick 308 Ravish

Ravish is a very pretty medium berry shade with a bit of pink. I can see myself reaching for this a lot if I can overlook Heavenly!

CoverGirl Lip Perfection Lipstick 308 Ravish
I love these kinds of shades because they're a fun alternative to muted reds.

CoverGirl Lip Perfection Lipstick 310 Smitten

Smitten is a cool-toned plum shade. I was a little hesitant to pick this one up because it looked so blue-based in the tube. I knew that berry shades worked well with me, but this was the first time I'd try one that had a lot more blue in it and that was cooler.
CoverGirl Lip Perfection Lipstick 310 Smitten
I thought for a mere $2, it wouldn't hurt to experiment with something a little bit further outside my comfort zone. I wore it a few times and I liked it more and more. It would make a great shade for Wintertime, especially.

CoverGirl Lip Perfection Lipstick 324 Tantalize

Tantalize is a pink orchid shade that leans cool. It's not so light that it makes me look ill. I really like this shade for Springtime.
CoverGirl Lip Perfection Lipstick 324 Tantalize

CoverGirl Lip Perfection Lipstick 355 Tempt

Tempt is a neutral raspberry red. I find this shade to be very flattering and is more wearable for everyday than Hot since it's more subdued.
CoverGirl Lip Perfection Lipstick 355 Tempt
I think this would look more purple and berry toned on someone with lighter skin tone than me. It's really lovely!

CoverGirl Lip Perfection Lipstick 360 Euphoria

I bought Euphoria at the same time as Smitten. I actually thought Euphoria was going to be my super daring color because it looked so dark in the tube. Turns out on me, it's a very nice and rich bordeaux color. It's funny, I thought this would look super vampy on me. It actually looks like a very wearable berry tone for the holiday season.
CoverGirl Lip Perfection Lipstick 360 Euphoria 
I'm learning that my oliveness turns intense berry tones into very wearable and casual shades for me. I find that so fascinating.


I really like all the shades I picked up. My favorite of the bunch has to be Heavenly. It was the first pink lipstick that didn't make me look ill. Euphoria surprised me the most. From what I could tell online, it seemed like a really bold shade. Once I tried it on, it just kind of goes with my complexion. Funny how these things work! Smitten was the one that turned out to be my most "daring" color.

I highly recommend that you visit your local Big Lots and see if there are any of these lipsticks available. The pigmentation is wonderful and the wear-time is pretty solid. It's not a long-wearing lipstick so it doesn't make any outrageous claims. I'd say it lasts about 3-4 hours before you'd need to reapply and of course, it would depend on how often you're eating/drinking.

I'm curious to know if there will be any more of these available next time I visit Big Lots. I've passed on a few lighter pink white-based shades that I was certain would not look good on me. I'm sure they'd look lovely on other people, though. I heard that Spellbound is a dupe for MAC Girl About Town.

Have you tried any of the CG Lip Perfection/Colorlicious lipsticks before? Do you live near a Big Lots? Let me know if you found any treasures in the comments below!